
Wireshark for Beginners: The Complete Guide to Packet Capture & Traffic Analysis (2026)
Every time you open a website, send an email, or stream a video, your computer is quietly sending and receiving thousands of small data packets. Wireshark lets you see all of that traffic in real time, so you can understand exactly what’s happening on your network. This Wireshark for beginners guide walks you through everything you need — from installation to filtering to real security analysis — using plain language and real examples.
Before You Start
Table of Contents
What Is Wireshark?
If you’re looking for a simple Wireshark for beginners explanation, here it is:
Wireshark is a free, open-source tool that captures and displays every packet of data moving through your network. Think of it like a security camera for your internet connection — it doesn’t stop anything, it just shows you what’s happening.
Network admins use it to fix slow connections. Cybersecurity teams rely on it to spot unusual or malicious behavior on a network. Students use it to actually see how the internet works instead of just reading about it.
Pros and Cons of Wireshark
Pros:
- Completely free and open source
- Works on Windows, macOS, and Linux
- Shows extremely detailed packet-level information
- Huge community and documentation support
- Supports hundreds of network protocols
Cons:
- Can feel overwhelming for total beginners (too much data at once)
- Doesn’t work well on encrypted traffic (you’ll see the packet, not the content)
- Requires some networking knowledge to use effectively
- Not built for large-scale, continuous monitoring like enterprise tools
Is Wireshark Safe to Use?
Yes — Wireshark for beginners is completely safe and legal to install and use. It’s used by network administrators, students, and cybersecurity professionals worldwide.
What matters is how you use it:
- Capturing traffic on your own network or a network you own/manage — completely legal
- Capturing traffic on a network you don’t have permission to access — illegal in most countries
- Using Wireshark on a public Wi-Fi network you don’t own can also raise legal and ethical issues
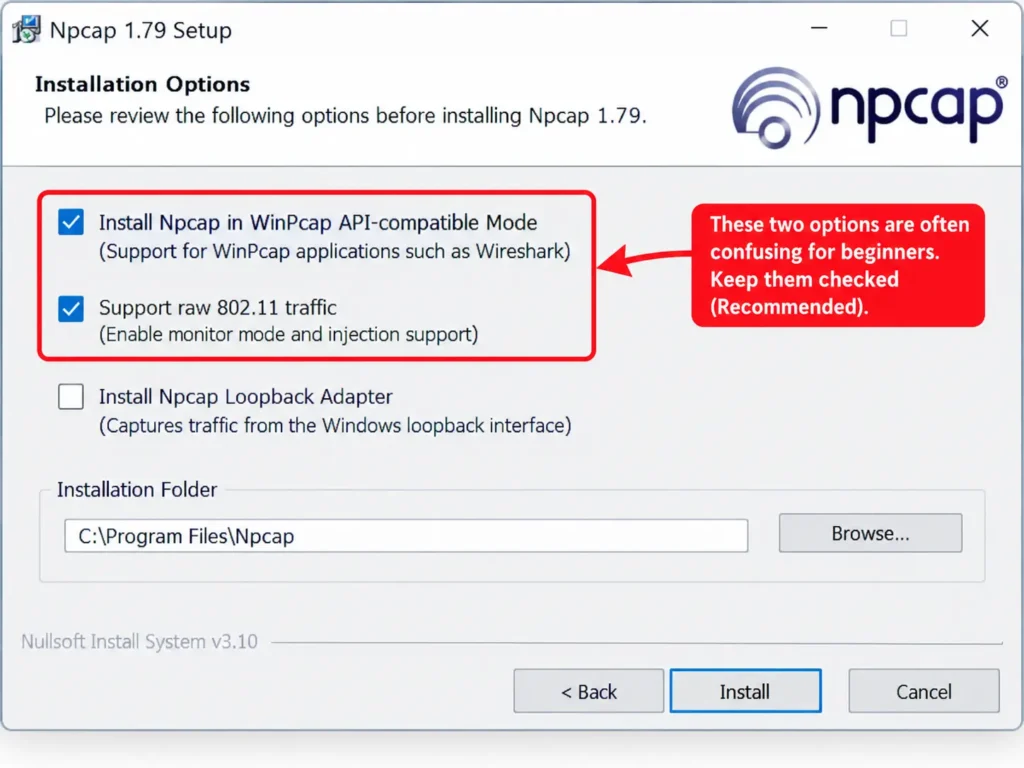
You don’t have to tick every optional box during setup. The one component you genuinely need on Windows is Npcap, since it’s what allows Wireshark to actually capture live traffic. The rest of the installer options are just extras.
Prerequisites Before You Start
Before diving into this Wireshark for beginners guide, you don’t need to be an expert — but a little background makes everything much easier to follow:
- Basic networking concepts — what an IP address, port, and protocol are
- Basic command line usage — you’ll open a terminal a few times
- Curiosity about how data moves — that’s really it
If you’re completely new to networking, spend 20-30 minutes learning the basics of IP addresses and ports before continuing. It’ll make everything below click faster.
How to Install Wireshark
Wireshark runs on every major operating system. This Wireshark for beginners installation guide covers each one step by step.
Windows Installation + Npcap Explained
- Go to the official Wireshark website and download the Windows installer.
- Open the downloaded file and walk through each step of the setup process.
- When you reach the Npcap installation screen, keep both boxes checked:
- “Install Npcap in WinPcap API-compatible Mode”
- “Support raw 802.11 traffic”
Npcap is the driver that actually lets Wireshark capture live packets from your network card. Without it, Wireshark can only open old capture files — it can’t capture anything new.
macOS Installation
- Download the
.dmgfile from the official Wireshark site, or install via Homebrew:
brew install --cask wireshark
- Open the app and grant it permission to access network devices when prompted.
Linux/Ubuntu/Kali Installation
Open a terminal and run:
sudo apt update
sudo apt install wireshark -y
During installation, choose “Yes” when asked if non-root users should be allowed to capture packets — this saves you from running Wireshark as sudo every time.
Common Installation Problems
- No interfaces showing up in the list — this usually means Npcap didn’t install properly. Uninstall Wireshark, reinstall it, and make sure the Npcap checkbox is selected this time.
- “Permission denied” on Linux — Add your user to the
wiresharkgroup:
sudo usermod -aG wireshark $USER
Then log out and back in.
- Wireshark won’t open on Windows — Run the installer as Administrator.
Understanding the Wireshark Interface
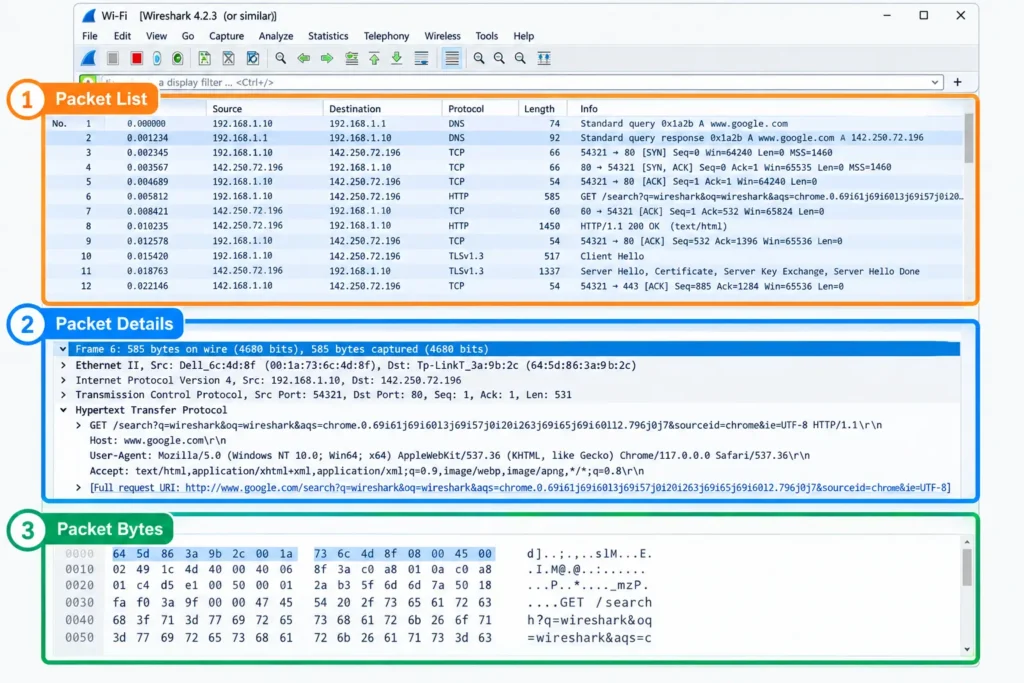
For anyone new to networking, this is the part of the Wireshark for beginners journey that looks intimidating at first. It’s actually just three simple sections working together.
Menu Bar, Toolbars, and the 3 Panels
- Packet List (top panel): Every captured packet, one per row, with columns for number, time, source, destination, protocol, and length.
- Packet Details (middle panel): Click any packet, and this panel breaks it down layer by layer — Ethernet, IP, TCP, and so on.
- Packet Bytes (bottom panel): The raw hex data of the packet, for deep inspection
Packet Color Coding Explained
Wireshark automatically colors packets so you can scan traffic faster:
- Light purple/blue — TCP traffic
- Light blue — UDP traffic
- Black — packets with errors
- Green — HTTP traffic
You can customize these colors, but the defaults are usually enough for beginners.
Starting Your First Packet Capture
This is where the real Wireshark for beginners practice begins.
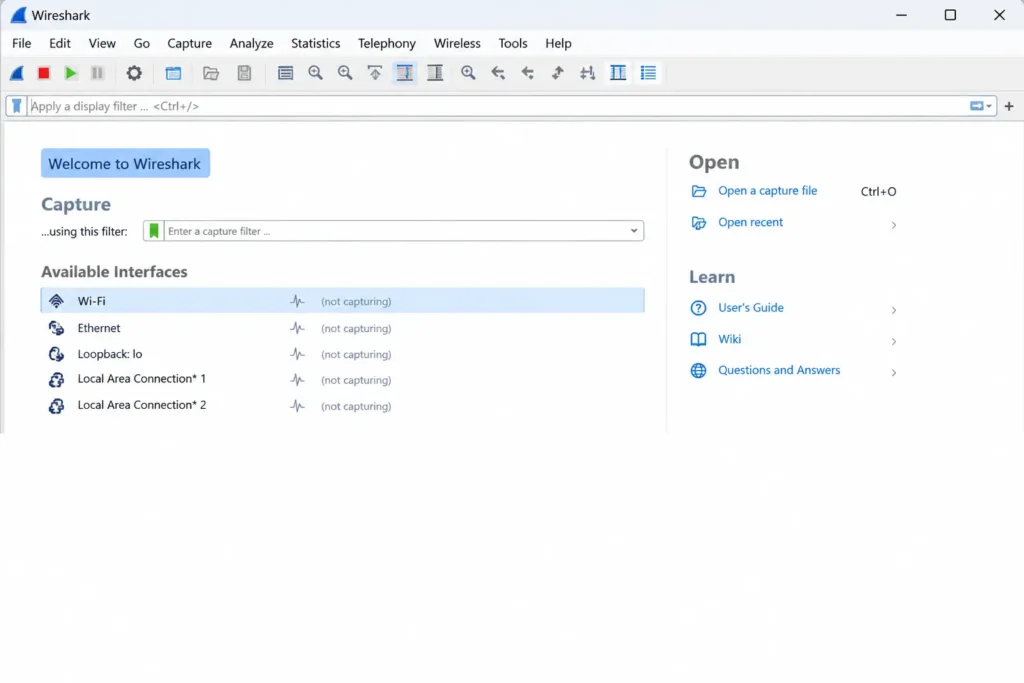
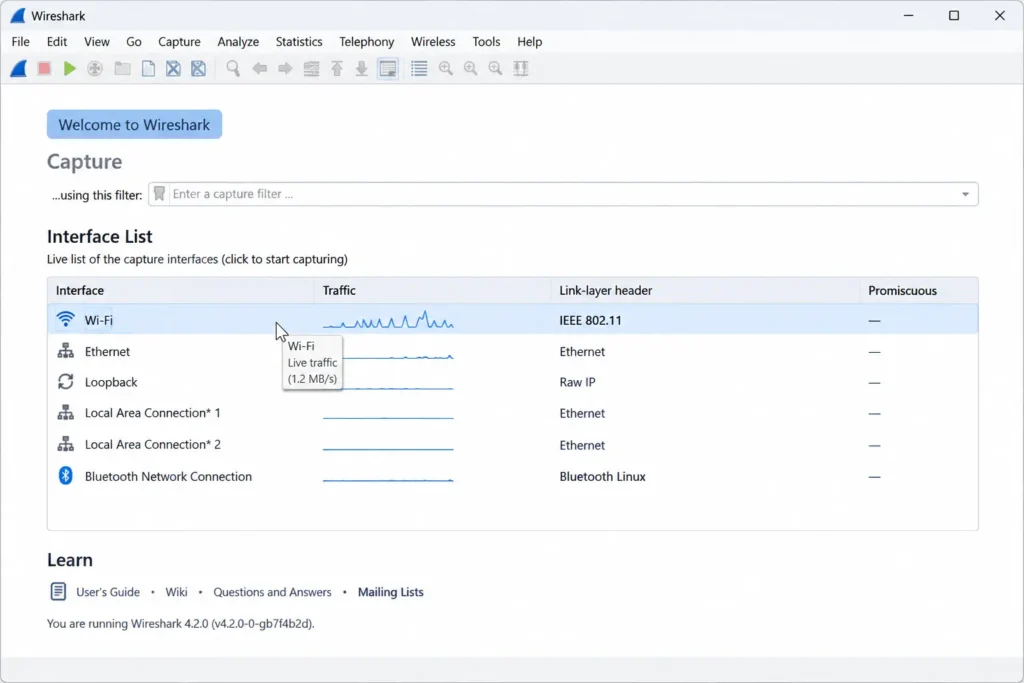
- Open Wireshark. You’ll see a list of network interfaces (Wi-Fi, Ethernet, etc.), each with a small live traffic graph next to it.
- Double-click the interface you use to connect to the internet (usually Wi-Fi on a laptop).
- Wireshark starts capturing immediately.
- Open a browser and visit any website to generate some traffic.
- Click the red Stop button once you have 20-30 packets.
Capturing Only Your Own Traffic on WiFi
On most home Wi-Fi networks, you’ll only see your own device’s traffic by default — this is normal, not a limitation. To confirm you’re only seeing your machine’s traffic, filter by your device’s IP address:
ip.addr == 192.168.1.5Replace the IP with your actual device IP, which you can find by running ipconfig (Windows) or ifconfig (Mac/Linux) in a terminal.
Capture Filters vs Display Filters
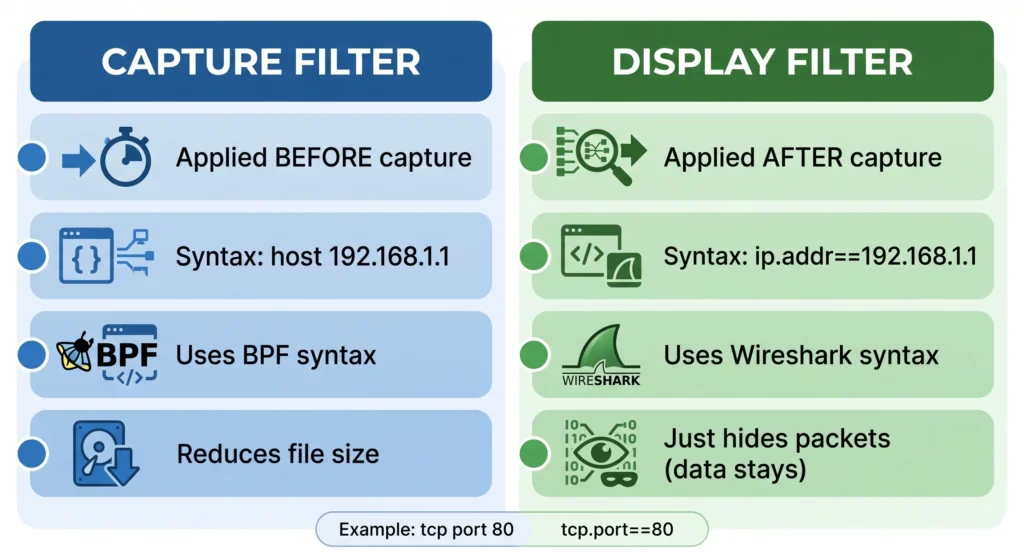
This is one of the most confusing parts of any Wireshark for beginners guide, so let’s make it simple.
| Capture Filter | Display Filter | |
|---|---|---|
| When applied | Before capturing starts | After packets are already captured |
| What it does | Only saves matching packets | Just hides non-matching packets (data is still there) |
| Syntax style | BPF syntax (host, port) | Wireshark syntax (ip.addr, tcp.port) |
| Example | tcp port 80 | tcp.port == 80 |
| Best for | Reducing file size on long captures | Analyzing traffic you already captured |
Simple rule: If you know exactly what you want before capturing, use a capture filter. If you already captured everything and want to narrow it down afterward, use a display filter. Most beginners will use display filters 90% of the time.
Essential Display Filters for Beginners
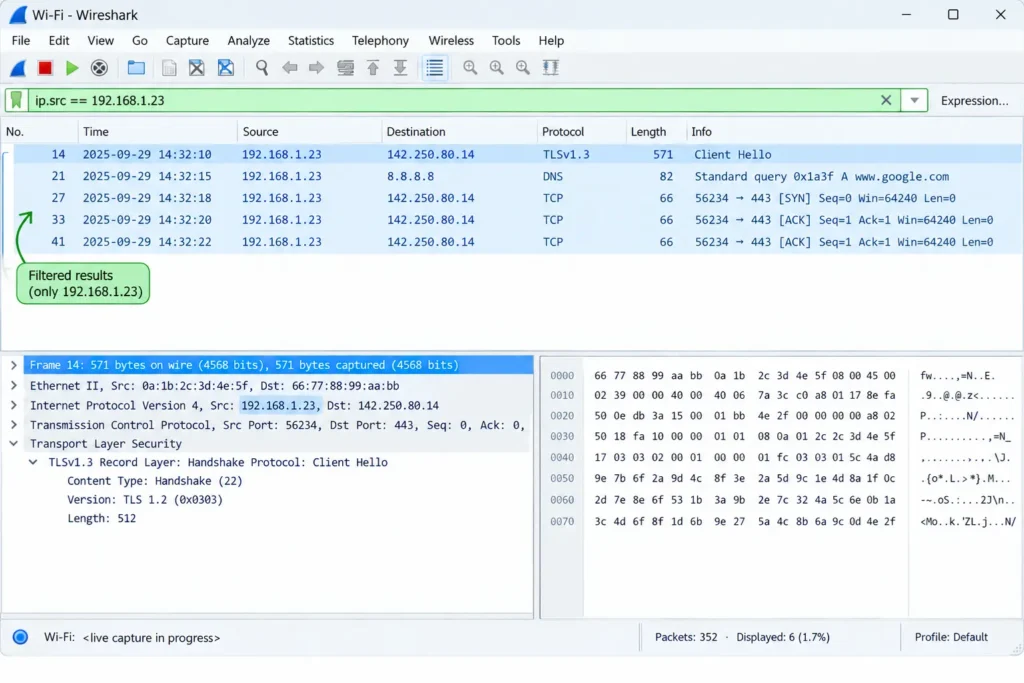
Every Wireshark for beginners tutorial starts here — the filter bar sits right at the top of Wireshark. Type a filter, hit Enter, and the list updates instantly. A valid filter turns the bar green.
Filter by IP Address
ip.addr == 192.168.1.1Shows all traffic to or from that IP.
ip.src == 192.168.1.1Shows only traffic coming from that IP.
Filter by Port
tcp.port == 80Shows traffic on port 80 (standard web traffic).
Filter by Protocol
http
dns
tcp
Just type the protocol name to see only that type of traffic.
Combining Filters
http and tcp.port == 80Shows only HTTP traffic on port 80.
not arpHides ARP traffic, which can clutter your view.
Real example: If your Netflix stream keeps buffering, you could filter ip.addr == [Netflix server IP] to see if packets are being dropped or delayed from that specific connection.
Advanced Filtering Techniques
Once you’re comfortable with basic filters, these help you dig deeper into large captures.
Find HTTP Requests
http.request.method == "GET"Shows every GET request — the type of request your browser sends to load a webpage.
Filter by Packet Size
tcp.len >= 100 and tcp.len <= 500Useful for spotting unusual traffic patterns, since attacks often use abnormally sized packets.
Search Packet Content
http.host contains "google"Shows only traffic related to a specific website.
frame contains "password"Searches for the word “password” anywhere in the packet — useful for spotting data sent in plain text.
Exclude Normal Browser Traffic
http.request and !(http.user_agent contains "Mozilla")Most real browsers include “Mozilla” in their user agent. Traffic without it often comes from scripts or bots, not humans.
How to Follow a TCP Stream (and UDP Stream)
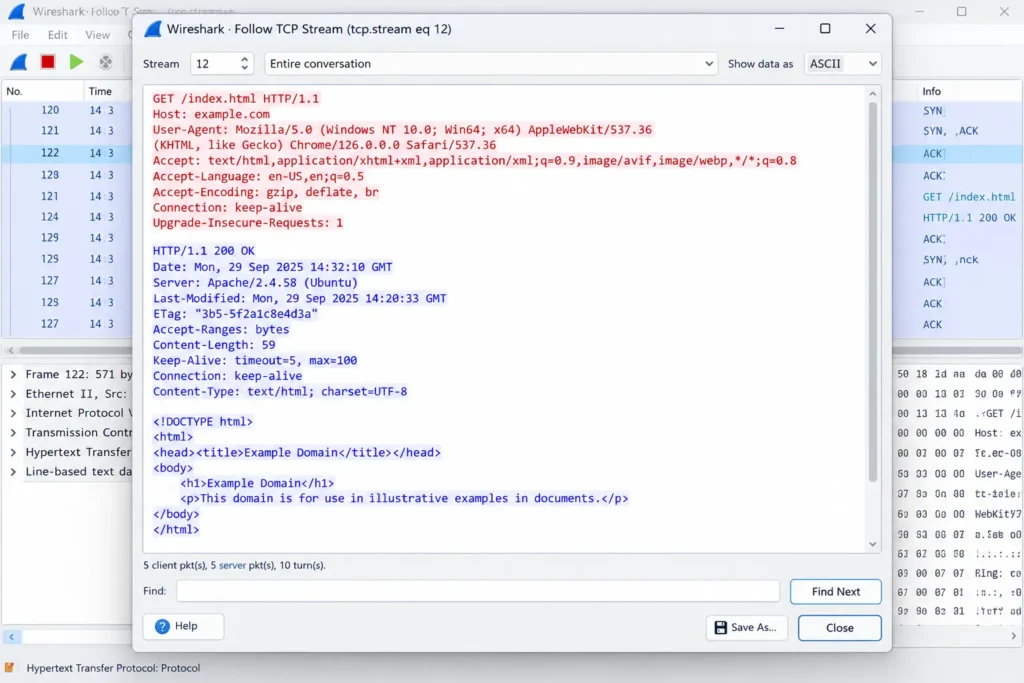
A TCP stream is simply the full back-and-forth conversation between your device and a server, reassembled into one readable view instead of scattered individual packets.
How to use it:
- Right-click any TCP packet.
- Select Follow > TCP Stream.
- A new window opens showing the full conversation — your requests in one color, the server’s replies in another.
Real example: If you follow the stream of an unencrypted FTP login, you can literally see the username and password typed in plain text — which is exactly why unencrypted protocols like FTP are considered risky today.
Following a UDP stream works the same way (right-click → Follow → UDP Stream), but since UDP has no built-in sequence numbers like TCP, Wireshark simply reconstructs the conversation based on the order packets were captured, not guaranteed delivery order.
Wireshark Statistics Tools
Filters aren’t the only way to analyze traffic. Wireshark’s Statistics menu gives you a bird’s-eye view without manually scrolling through packets.
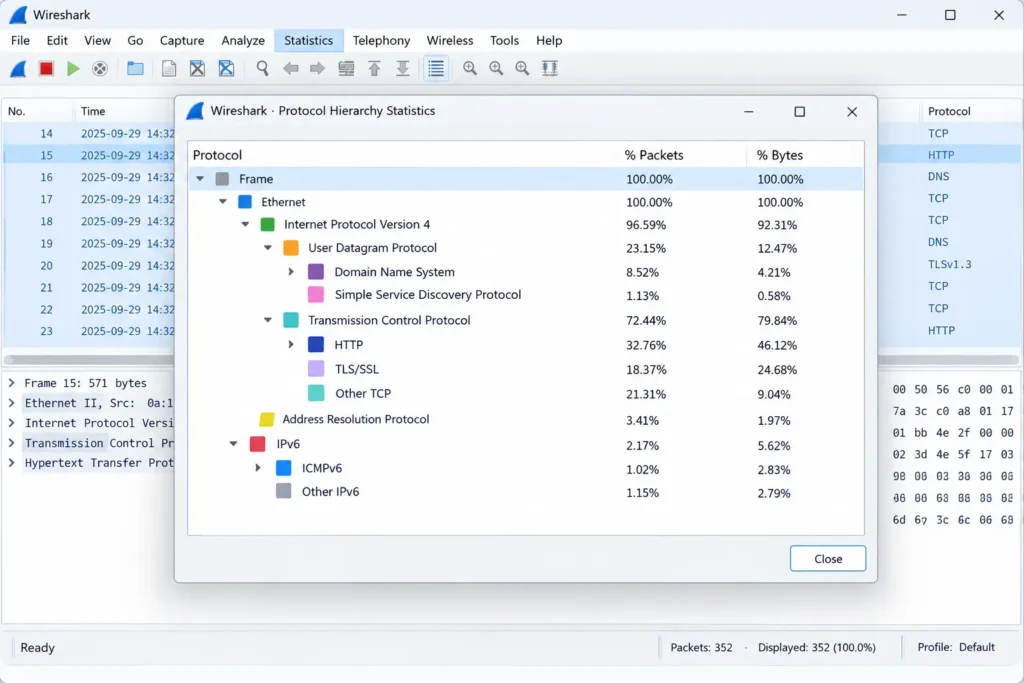
- Protocol Hierarchy (Statistics > Protocol Hierarchy): Shows what percentage of your capture is HTTP, DNS, TCP, etc. Great for spotting unusual protocol usage instantly.
- Conversations (Statistics > Conversations): Lists every pair of devices that talked to each other, along with how much data they exchanged.
- I/O Graph (Statistics > I/O Graph): A visual line graph of traffic over time — useful for spotting spikes or unusual bursts of activity.
Step-by-Step: How to Analyze Wireshark Packets
Here’s a simple workflow to follow every time you open a capture:
- Capture or open a file — either live traffic or a saved
.pcapngfile. - Get an overview — check Protocol Hierarchy to see what kind of traffic dominates the capture.
- Apply a broad filter — narrow down by protocol (
http,dns) or IP address. - Inspect individual packets — click through the Packet Details panel to understand structure.
- Follow interesting streams — right-click and follow TCP/UDP streams for full context.
- Export what matters — save only the relevant packets for reporting or further analysis.
Following this order prevents you from getting lost in thousands of packets with no direction.
Saving & Exporting: PCAP vs PCAPNG
When you save a capture, Wireshark gives you a file format choice:
- PCAP — the older, simpler format. Still widely supported by other tools.
- PCAPNG — the newer default format. Supports more metadata, multiple interfaces, and comments.
When to use which:
- Use PCAPNG by default — it’s what Wireshark uses natively.
- Use PCAP only if you need compatibility with an older tool that doesn’t support PCAPNG.
To export only filtered packets:
- Apply your filter.
- Go to File > Export Specified Packets.
- Choose “Displayed” under Packet Range.
- Save with a clear filename.
Basic Security Traffic Analysis
Wireshark is widely used to spot early signs of suspicious activity. Here are a few beginner-friendly checks:
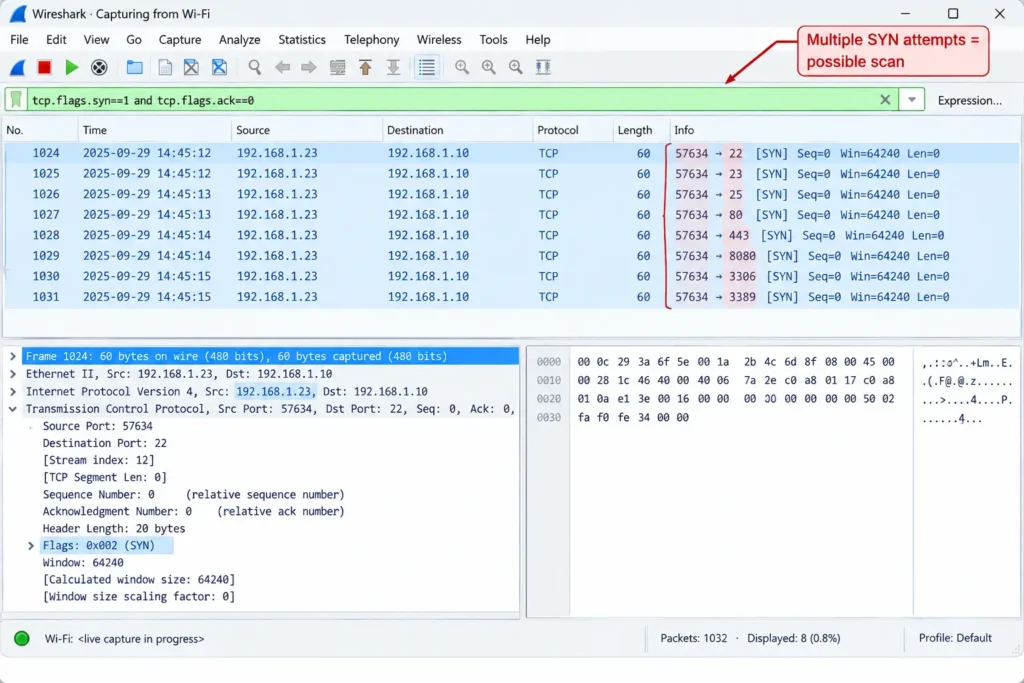
- Port scanning:
tcp.flags.syn == 1 and tcp.flags.ack == 0— a flood of these from one source usually means someone is probing your network for open ports. - Suspicious DNS activity: filter with
dnsand look for unusually long domain names or repeated requests to the same domain — a common sign of data being secretly sent out. - Clear-text credentials:
http contains "pass"— helps catch login details being sent unencrypted, which is a real security risk.
These filters won’t make you a security expert overnight, but they’re the same starting point real analysts use
What Wireshark Can’t Do
It’s just as important to know Wireshark’s limits:
- It is not an intrusion detection system — it won’t alert you automatically when something bad happens.
- It cannot monitor the entire internet — it only sees traffic passing through the interface you’re capturing on.
- It cannot decrypt most encrypted traffic (like HTTPS) without special keys.
- It doesn’t send or modify network traffic — it only observes.
Understanding these limits prevents wrong assumptions about what Wireshark can protect you from.
Cool Things You Can Do With Wireshark
Beyond basic troubleshooting, Wireshark is genuinely fun to explore:
- Watch exactly what happens when you type a website into your browser (DNS lookup, TCP handshake, HTTP request — all visible)
- See how much data an app sends in the background even when you’re not using it
- Analyze why a video call is lagging by checking for dropped or delayed packets
- Learn how VPNs actually work by comparing traffic with and without one turned on
How Long Does It Take to Learn Wireshark?
For anyone following a Wireshark for beginners path, most people can learn basic capturing and filtering within a few hours of hands-on practice. Getting comfortable with advanced filters and real security analysis usually takes a few weeks of regular use.
The fastest way to learn is simple: capture your own everyday traffic (browsing, streaming, gaming) and try to identify what’s happening, packet by packet.
Next steps: Once you’re comfortable with this guide, look into TShark (Wireshark’s command-line version) and practice with public sample capture files to sharpen your filtering skills.
Frequently Asked Questions
How do you analyze Wireshark packets?
Capture traffic, apply a filter to narrow it down, click on individual packets to see their details, and follow the TCP/UDP stream if you need the full conversation.
Is Wireshark safe to install?
Yes. It’s free, open-source, and safe to install on Windows, macOS, and Linux. Just make sure you download it from the official website.
What’s the difference between a capture filter and a display filter?
A capture filter decides what gets saved before capturing starts. A display filter just hides packets after they’ve already been captured — the data is still there, just filtered from view.
Can Wireshark capture all network traffic?
No. It can only capture traffic passing through the network interface you select, and it cannot see the entire internet or traffic on networks you’re not connected to.
What is a TCP stream?
It’s the full, reassembled conversation between two devices over TCP, shown as one readable exchange instead of separate individual packets.
What are the pros and cons of Wireshark?
Pros: free, detailed, cross-platform, huge community. Cons: steep learning curve for beginners, limited use on encrypted traffic, not built for continuous enterprise monitoring.
Can I capture only my machine’s traffic on Wi-Fi?
Yes, and on most home networks, that’s what you’ll see by default. You can also filter specifically by your device’s IP address to confirm.
Wireshark vs tcpdump — which should I use?
Wireshark is better for beginners because of its graphical interface. tcpdump is faster and more lightweight, often preferred for quick command-line captures on servers.
Is this Wireshark for beginners guide enough to get started?
Yes — this guide covers installation, capturing, filtering, and basic security analysis, everything a complete beginner needs to start using Wireshark confidently.
Conclusion
This Wireshark for beginners guide can feel like a lot to take in at first, but once you understand the three panels, the difference between capture and display filters, and how to follow a stream, most of the confusion disappears. Start small — capture your own browsing traffic, apply a few filters, and build up from there. The more you practice, the more the network around you starts to make sense.